


Discover how to make a precise cut of artificial turf to achieve professional results. Save material, achieve invisible joints, and improve the final finish with advice from GardenStore.
Why Does a Good Cut Make a Difference?
A professional cut is not just an aesthetic matter. It also influences the efficiency of the work, use of material and of course the durability of the turf. An inadequate cut of artificial turf causes visible joints, misaligned fibers, and poorly fitted areas. The result? A low-quality finish, more time spent on corrections, and, most importantly, a dissatisfied customer.
The good news: all this can be avoided with proper planning and the correct tools.
Tools Needed for a Quality Cut in your Artificial Turf
Essential Basic Equipment:
- Sharp cutter (ideally with trapezoidal blades)
- Long metal ruler
- Protective gloves
- Rigid cutting surface (such as a board or wood base)
- Detailed plan of the installation area
How to Cut Artificial Turf Step by Step
Layout Planning
Start with a precise measurement of the surface on which the artificial turf is to be installed. If the terrain has curves, corners, or obstacles, it is ideal to work with a plan detailed. This way you will know how to orient each strip, reduce joints and minimize waste.
Not sure where to start? Send us your plan. At GardenStore we help you define the most efficient layout.
Cut with Margin and from the Reverse
Leave between 15 and 20 cm of margin per side. Always cut
Present the Turf before Fixing It
Place the strips on the ground following the previous planning. They should all go in the same direction to maintain visual uniformity.
Useful tip: orient the fibers towards the usual viewing point (living area, terrace, windows, passage areas).
Obstacles: Mark and Cut from Behind
When you encounter trees, planters, lampposts or columns, mark the areas on the back of the turf. If the cut is long, mark every 30 cm and cut joining the points. Use the cutter firmly on a solid base.
Always leave a small margin to adjust. Cutting too much is a difficult mistake to correct.
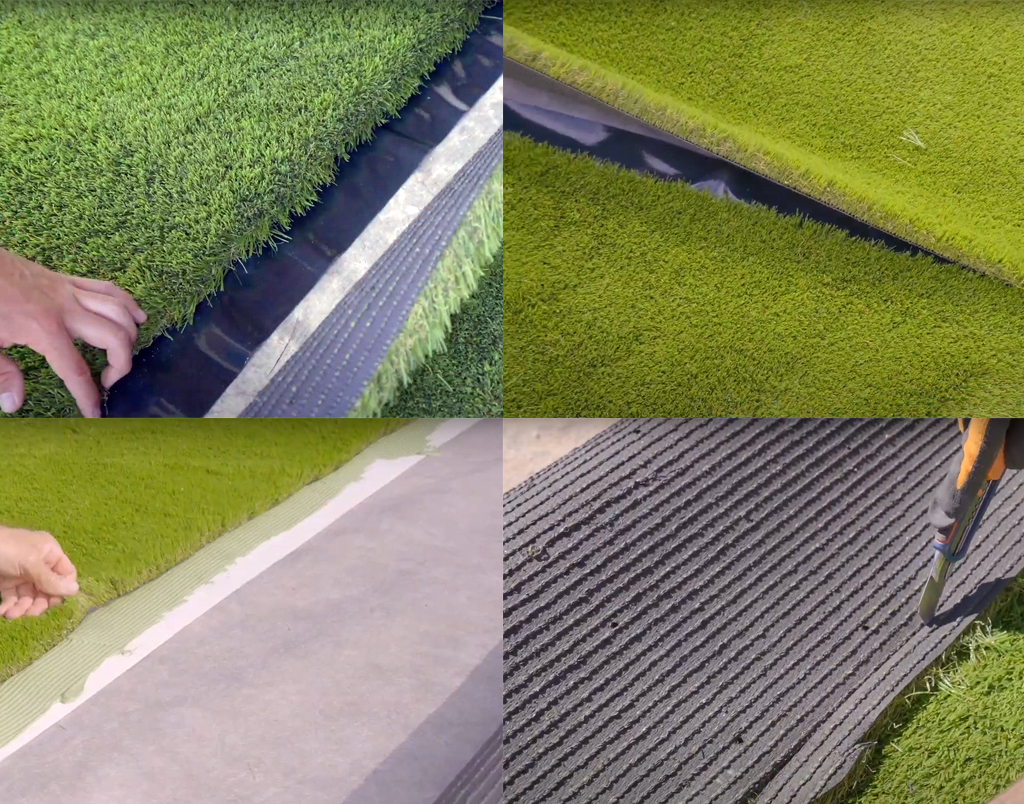
Clean the Edges before Joining the Strips
Trim the sides to remove the factory edges. This prevents them from fraying and improves the fit between pieces. Leave between 3 and 5 mm of separation for a more natural result.
Final Adjustment of the Perimeter
With the strips of artificial turf already placed on the surface, cut off the excess on the edges following the contour of the terrain. Do it from the reverse for a cleaner finish.
Drainage: Do not Neglect It
If there are drains or sewers, cut the turf in a U shape so that the water flows well without leaving the grid in sight.
Areas that Require more Technical Cuts
- Edges, corners and finishes
- Swimming pools or curved areas
- Vertical elements such as trees, lampposts, columns or planters
- Drainage areas or water evacuation points
Need technical support? Count on GardenStore
At GardenStore we offer technical advice to plan each installation when buying the artificial turf with us. If you send us the sketch of your project, we will help you reduce waste and optimize the work.
In addition, we have specific guides depending on the type of surface (soil, tile, pavement) where we explain everything you need: soil preparation, adhesives, fixings, meshes, etc.
Soil
Pavement
Personalized Advice at each Step of the Project
The technical and commercial team of Gardenstore is available before, during and after each installation. We want you to work with confidence, precision and without unforeseen events. Contact us and we will advise you.
If you prefer, visit us at any of our physical points of sale and distributors. Surely there is one near you.
